SELENIUM
<aside> ? 참고사항
동영상 강의보다 해당 Notion에 코드들이 가장 최신버젼입니다.
(강의와 조금 다르다고 코드를 바꾸지 않으셔도 됩니다.)
</aside>
Appendix
[a] 간단한 상품 입력 사이트 접속
driver.get("<https://forms.gle/XQw79ui6WP9ZFUUV8>") time.sleep(random.uniform(9,10)) # 간단한 상품 입력 사이트 [b] 코레일 로그인 페이지 접속
driver.get('<https://www.letskorail.com/korail/com/login.do>') time.sleep(random.uniform(9,10)) [c] 코레일 예약 페이지 접속
driver.get('<https://www.letskorail.com/ebizprd/EbizPrdTicketpr21100W_pr21110.do>') time.sleep(random.uniform(9,10)) # 코레일 예약 페이지 [d] 다음 뉴스 페이지 이동
driver.get("<https://search.daum.net/search?w=news&nil_search=btn&DA=NTB&enc=utf8&cluster=y&cluster_page=1&q=>") time.sleep(random.uniform(9,10)) # 다음 뉴스 페이지로 이동 [e] SS 로그인
driver.get('<https://nid.naver.com/nidlogin.login?url=https%3A%2F%2Fsell.smartstore.naver.com%2F%23%2FnaverLoginCallback%3Furl%3Dhttps%253A%252F%252Fsell.smartstore.naver.com%252F%2523>') time.sleep(random.uniform(9,10)) [f] SS 2차 로그인
driver.get("<https://accounts.commerce.naver.com/login?url=https%3A%2F%2Fsell.smartstore.naver.com%2F%23%2Flogin-callback>") time.sleep(random.uniform(9,10)) [g] SS 상품등록
driver.get('<https://sell.smartstore.naver.com/#/products/create>') time.sleep(random.uniform(9,10)) [h] 네이버 쇼핑탭에서 공백(띄어쓰기 1개)으로 검색한 페이지로 접속
driver.get("<https://search.shopping.naver.com/search/all?query=&prevQuery=>") time.sleep(random.uniform(9,10)) # 네이버 쇼핑 페이지에서 공백으로 검색한 페이지로 접속 [i] 도매꾹 접속
driver.get("<https://domeggook.com/main/>") time.sleep(random.uniform(9,10)) [j] 직방 검색초기 사이트 진입
driver.get('<https://www.zigbang.com/home/apt/danjis/1023>') time.sleep(random.uniform(9,10)) [k] SRT 사이트 진입
driver.get("<https://etk.srail.kr/main.do>") time.sleep(random.uniform(9,10)) [L] interpark 로그인 사이트 진입
driver.get("<https://ticket.interpark.com/Gate/TPLogin.asp>") time.sleep(random.uniform(9,10)) [M] 네이버 테니스장 사이트 진입
driver.get("<https://booking.naver.com/booking/10/bizes/217811/items/4453178>") time.sleep(random.uniform(9,10)) [N] 스마트스토어 상품조회 페이지
driver.get("<https://sell.smartstore.naver.com/#/products/origin-list>") time.sleep(random.uniform(9,10)) pyautogui 키보드/마우스 자동화
[1] 마우스 위치 출력
#!pip install pyautogui import pyautogui import time while True: current_x, current_y = pyautogui.position() print(f"{current_x}, {current_y}") time.sleep(1) # 마우스 x,y좌표 확인 [2] 마우스 위치 이동
pyautogui.moveTo(437,648) # 마우스를 특정 좌표로 이동 [3] 마우스 클릭
pyautogui.click() # 마우스 클릭 [4] 키보드 입력
pyautogui.write('sodwkdrhcjdqkwl') # 키보드로 특정 값을 입력 # 영어키로 입력해야 함 [4-2] 한글로 되어있는 텍스트를 넣고 싶은데, 한영키로는 너무 불편할때
- 아래와 같이 입력하면, text 자체를 복사해서 붙혀넣는 방식으로 구현이 가능함
import pyautogui import pyperclip pyperclip.copy('product_name에 탁구라켓 손잡이 땀흡수 밴드 1P') # 한글 텍스트를 클립보드에 복사 pyautogui.hotkey('ctrl', 'v') # 클립보드에서 텍스트를 붙여넣기 [5] 한영 전환키 클릭
pyautogui.press('hangul') # 한영 전환 Selenium
[6] (win/mac공용) ChromeDriver 실행하는 코드 자동화할때 기본적으로 가동시켜야 함
# #--- 초기 패키지 설치(아래 코드가 안될때도 실행) ---# # # (240424) 코드 일부 업데이트되었습니다. # !python -m pip install --upgrade pip # !pip uninstall selenium -y # !pip install selenium -U # !pip uninstall webdriver-manager -y # !pip install webdriver-manager -U # !pip uninstall undetected_chromedriver -y # !pip install undetected_chromedriver -U # !pip install user_agents # !pip install pyperclip # !pip install chromedriver_autoinstaller #--- 라이브러리 import ---# import pandas as pd # DataFrame을 컨트롤하는 라이브러리 import warnings, os, time, shutil, urllib, random # warnings : 파이썬 경고 제어 # os : 경로 또는 파일 제어 # time : 시간 제어(일정시간 delay등) # shutil : os의 폴더 제어(생성/삭제) # urlib : 특정 url에서 이미지를 받을때 사용 warnings.filterwarnings(action='ignore') # 파이썬에서 불필요한 warning은 안뜨게 함 from PIL import Image # 파이썬에서 이미지를 다룰때 사용(png등을 불러들여서 리사이즈 저장 등) from selenium.webdriver.chrome.service import Service as ChromeService from webdriver_manager.chrome import ChromeDriverManager from selenium.webdriver.common.by import By # Keys.ARROW_DOWN , Keys.ARROW_LEFT , Keys.ARROW_RIGHT, Keys.ARROW_UP , Keys.BACK_SPACE , Keys.CONTROL, Keys.ALT , Keys.DELETE , # Keys.ENTER , Keys.SHIFT, Keys.SPACE , Keys.TAB , Keys.EQUALS , Keys.ESCAPE, Keys.HOME , Keys.INSERT , PgUp Key, Keys.PAGE_UP, # Keys.PAGE_DOWN , Keys.F1 , Keys.F2 , Keys.F3 , Keys.F4, Keys.F5 , Keys.F6 , Keys.F7 , Keys.F8 , Keys.F9 , Keys.F10, Keys.F11 , Keys.F12 from selenium.webdriver.common.keys import Keys from selenium.webdriver import ActionChains #--- 크롬 드라이버 실행 ---# import chromedriver_autoinstaller, random, os chromedriver_autoinstaller.install() import undetected_chromedriver as uc from user_agents import parse import selenium print(selenium.__version__) def make_user_agent(ua,is_mobile): user_agent = parse(ua) model = user_agent.device.model platform = user_agent.os.family platform_version = user_agent.os.version_string + ".0.0" version = user_agent.browser.version[0] ua_full_version = user_agent.browser.version_string architecture = "x86" print(platform) if is_mobile: platform_info = "Linux armv8l" architecture= "" else: # Window platform_info = "Win32" model = "" RET_USER_AGENT = { "appVersion" : ua.replace("Mozilla/", ""), "userAgent": ua, "platform" : f"{platform_info}", "acceptLanguage" : "ko-KR, kr, en-US, en", "userAgentMetadata":{ "brands" : [ {"brand":"Google Chrome", "version":f"{version}"}, {"brand":"Chromium", "version":f"{version}"}, {"brand":" Not A;Brand", "version":"99"} ], "fullVersionList" : [ {"brand":"Google Chrome", "version":f"{version}"}, {"brand":"Chromium", "version":f"{version}"}, {"brand":" Not A;Brand", "version":"99"} ], "fullVersion":f"{ua_full_version}", "platform" :platform, "platformVersion":platform_version, "architecture":architecture, "model" : model, "mobile":is_mobile #True, False } } return RET_USER_AGENT def generate_random_geolocation(): ltop_lat = 37.75415601640249 ltop_long = 126.86767642302573 rbottom_lat = 37.593829172663945 rbottom_long = 127.15276051439332 targetLat = random.uniform(rbottom_lat, ltop_lat) targetLong = random.uniform(ltop_long,rbottom_long) return {"latitude":targetLat, "longitude" : targetLong, "accuracy":100} options = uc.ChromeOptions() UA = "Mozilla/5.0 (Windows NT 10.0; Win64; x64) AppleWebKit/537.36 (KHTML, like Gecko) Chrome/122.0.0.0 Safari/537.36 Edg/122.0.0.0" options.add_argument(f"--user-agent={UA}") # User Agent 확인 : <https://www.whatismybrowser.com/detect/what-is-my-user-agent/> # [중요] 위에 링크에서 나오는 값을 UA에 넣어줘야 함 rand_user_folder = random.randrange(1,100) raw_path = os.path.abspath("cookies") os.makedirs(raw_path, exist_ok=True) user_cookie_name = f"{raw_path}/{rand_user_folder}" if os.path.exists(user_cookie_name) == False: os.makedirs(user_cookie_name, exist_ok=True) # options.user_data_dir = user_cookie_name # 쿠키 랜덤 설정 driver = uc.Chrome(user_data_dir=user_cookie_name, option = options) UA_Data = make_user_agent(UA,False) driver.execute_cdp_cmd("Network.setUserAgentOverride",UA_Data) # # user agent data 설정 GEO_DATA = generate_random_geolocation() driver.execute_cdp_cmd("Emulation.setGeolocationOverride", GEO_DATA) driver.execute_cdp_cmd("Emulation.setUserAgentOverride", UA_Data) driver.execute_cdp_cmd("Emulation.setNavigatorOverrides",{"platform":"Linux armv8l"}) [7] 특정 주소로 들어감
driver.get("<https://www.naver.com>") time.sleep(random.uniform(3,5)) [8] 선택한 FULL_XPATH에 특정 TEXT를 입력해줌
elem = driver.find_element("xpath", "FULL_XPATH") elem.send_keys("TEXT") time.sleep(random.uniform(3,5)) [9] 선택한 FULL_XPATH에 TEXT를 입력하고 ENTER키를 눌러줌
celem.send_keys(Keys.ENTER) time.sleep(random.uniform(3,5)) # 엔터 외 아래 키들 참고 # Keys.ARROW_DOWN , Keys.ARROW_LEFT , Keys.ARROW_RIGHT, Keys.ARROW_UP , Keys.BACK_SPACE , # Keys.CONTROL, Keys.ALT , Keys.DELETE , Keys.ENTER , Keys.SHIFT, Keys.SPACE , Keys.TAB , # Keys.EQUALS , Keys.ESCAPE, Keys.HOME , Keys.INSERT , PgUp Key, Keys.PAGE_UP, # Keys.PAGE_DOWN , Keys.F1 , Keys.F2 , Keys.F3 , Keys.F4, Keys.F5 , Keys.F6 , Keys.F7 , # Keys.F8 , Keys.F9 , Keys.F10, Keys.F11 , Keys.F12 [10] 선택한 FULL_XPATH를 클릭해줌
elem = driver.find_element("xpath", "FULL_XPATH") elem.click() time.sleep(random.uniform(3,5)) [11] 선택한 FULL_XPATH에 있던 값을 clear해줌
elem = driver.find_element("xpath", "FULL_XPATH") elem.clear() time.sleep(random.uniform(3,5)) [12] 선택한 FULL_XPATH에 있던 값을 TITLE 변수로 할당해주고,TITLE을 Print함
elem = driver.find_element("xpath", "FULL_XPATH") TITLE = elem.text print(TITLE) time.sleep(random.uniform(3,5)) [13] 페이지 스크롤을 0에서 10000point까지 아래로 내려줌
driver.execute_script("window.scrollTo(0, 10000)") [13-2] 현재 내가 보고있는 곳을 기준으로 스크롤을 ‘조금(100만큼)’ 내려줌
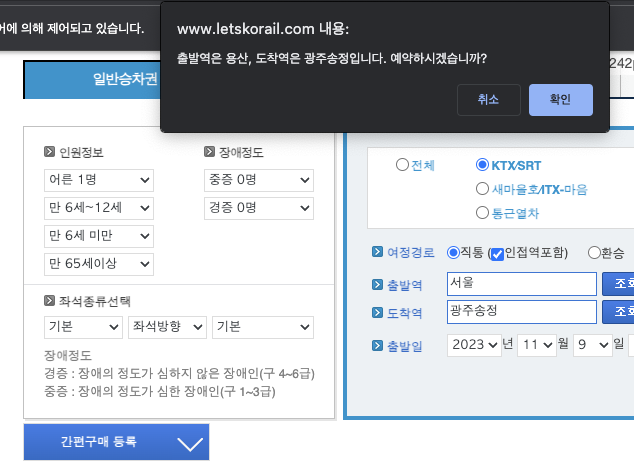
driver.execute_script("window.scrollBy(0, 100);") [14] 크롬창 상단에 alert가 떴을때 “확인 or 취소”하는 코드
!https://blog.kakaocdn.net/dn/bCGTXG/btszXn8WFOu/yskKnCXgbJsnam3mj2MxF0/img.png
[14-1] 크롬창 상단에 alert가 떴을때 “확인”하는 코드
driver.switch_to.alert.accept() time.sleep(random.uniform(3,5)) # accept() : alert가 떴을때 확인버튼을 클릭 [14-2] 크롬창 상단에 alert가 떴을때 “취소/무시”하는 코드
driver.switch_to.alert.dismiss() time.sleep(random.uniform(3,5)) # dismiss() : alert가 떴을때 창끄기 [16] 크롬 탭 이동
driver.switch_to.window(driver.window_handles[1]) time.sleep(random.uniform(3,5)) # 1번째 탭으로 이동 driver.switch_to.window(driver.window_handles[0]) time.sleep(random.uniform(3,5)) # 0번째 탭으로 이동 [17] 크롬 탭 종료
driver.close() [18] 0번째 탭을 제외하고는 모든 탭 제거(개편)
#--- 모든 탭 종료 및 0번째 탭으로 이동 ---# for i in range(100): if len(driver.window_handles) > 1: # driver.window_handles : driver의 tab의 리스트 # len(driver.window_handles) > 1 : driver tab의 리스트가 2개 이상이면 실행 driver.switch_to.window(driver.window_handles[1]) # 1번째 탭으로 이동 driver.close() # 해당 탭 종료 driver.switch_to.window(driver.window_handles[0]) # 0번째 탭으로 이동 else: driver.switch_to.window(driver.window_handles[0]) # 0번째 탭으로 이동 break # 탭이 하나만 남았으면 break time.sleep(random.uniform(3,5)) [19] 현재 chrome 창의 url을 출력해줌
CURRENT_URL = driver.current_url print(CURRENT_URL) OTHER
[20] URL_PATH의 정보를 request해서 불러옴 (크롬창에서 request하기)
import requests, json req = requests.get("URL_PATH") if 'NotFoundError' not in str(req.text): data1 = json.loads(req.text) data1 [21] img_folder_path 폴더를 삭제하고 다시 만듦(폴더 초기화)
import shutil img_folder_path = os.path.abspath("") + "/smartstore_img" # root 경로 + 이미지 폴더 경로 try: shutil.rmtree(img_folder_path) except: pass # 폴더 삭제(초기화) os.makedirs(img_folder_path, exist_ok=True) # 폴더 다시 생성 [22] FULL_XPATH 경로에 있는 이미지를 IMG_PATH에 저장
img_path = os.path.abspath("") + "/smartstore_img/IMG_NAME.png" # root 경로 + 이미지 경로 elem = driver.find_element("xpath", "FULL_XPATH") img_url = elem.get_attribute('src') # 이미지의 xpath를 경로로 저장 urllib.request.urlretrieve(img_url, img_path) # 이미지를 경로에 다운로드 [23] 이미지 열어서 resize 함 (기존사이즈 → (640,640))
img_path = os.path.abspath("") + "/smartstore_img/IMG_NAME.png" # root 경로 + 이미지 경로 image = Image.open(img_path) # 저장된 이미지 열기 resized_image = image.resize((640, 640)) # 이미지 리사이즈(스마트스토어 썸네일 사이즈) resized_image.save(img_path) # 리사이즈된 이미지 저장 [24] 1초 정도 sleep을 해줌
import time time.sleep(1) [25-1] jupyter notebook의 경로를 출력(현재 어느 파일에 노트북이 저장되어있는지 확인)
import os print(os.path.abspath("")) # 파이썬 root 폴더 경로 출력 [25-2] 아래 코드를 실행시키면 바로 Python 폴더가 열립니다.(이걸 사용하시면 더 편합니다)
import os os.system(f'start {os.path.abspath("")}') os.system(f'open {os.path.abspath("")}') # [Mac/Window] 파이썬 root 폴더의 위치의 탐색기 또는 finder창이 바로 뜸 [26] window/Finder 창에서 이미지 경로로 집어넣기
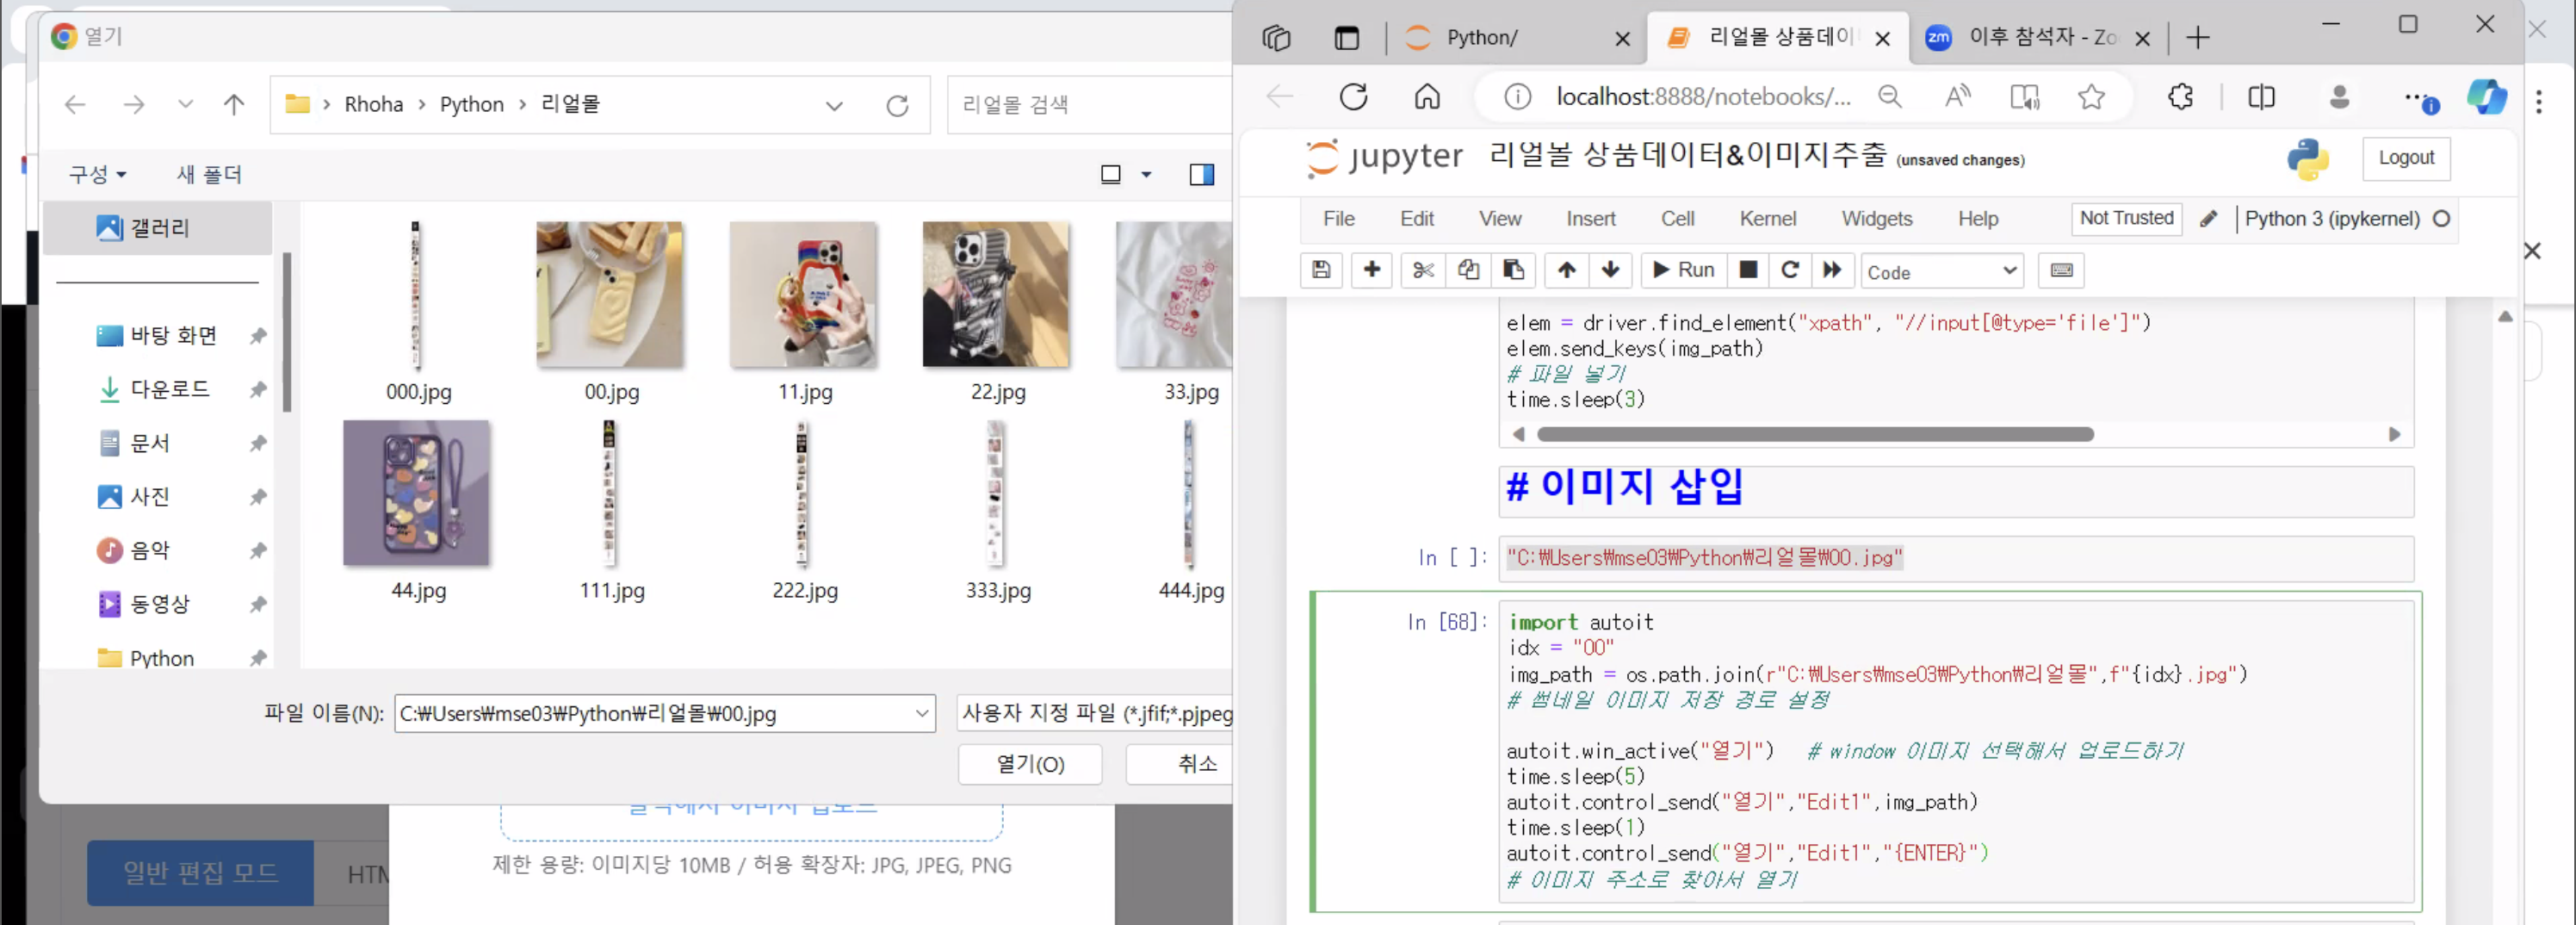
(특정 이미지 파일의 경로를 확인하는 방법 -> https://mainia.tistory.com/m/5112)
#### FINDER 창이 뜨기 전에 아래 코드를 실행시켜야 합니다 ### img_path = os.path.abspath("") + "/smartstore_img/IMG_NAME.png" # 이미지 경로 elem = driver.find_element("xpath", "//input[@type='file']") elem.send_keys(img_path) # 파일 넣기 time.sleep(random.uniform(3,5)) [26-2] window 탐색기 창 작동 (탐색기창에서 이미지 집어넣기)
(특정 이미지 파일의 경로를 확인하는 방법 -> https://mainia.tistory.com/m/5112)
!https://blog.kakaocdn.net/dn/1i5E0/btsAvik8S8K/jwYsCj3lUmJ4YDGOMsdeOK/img.png
!pip isntall -U pyautoit import autoit folder_path = r"C:\Users\mse03\Python\리얼몰" file_name = "01.jpg" img_path = os.path.join(folder_path,file_name) # 썸네일 이미지 저장 경로 설정 autoit.win_active("열기") # window 이미지 선택해서 업로드하기 time.sleep(5) autoit.control_send("열기","Edit1",img_path) time.sleep(1) autoit.control_send("열기","Edit1","{ENTER}") # 이미지 주소로 찾아서 열기 [27-1] 파이썬에서 csv 데이터를 DataFrame으로 불러오기
import pandas as pd pd.options.display.max_rows = 30 pd.options.display.max_columns = 100 import warnings, time warnings.filterwarnings(action='ignore') # warning을 무시하는 코드 product_df = pd.read_csv("domeggook_item_list.csv") product_df [27-2] 파이썬에서 DataFrame을 csv 데이터로 저장하기
product_df.to_csv("domeggook_item_list.csv", index=False) [28] 공공데이터포탈에서 법정동 데이터 다운로드해서 DataFrame으로 만듦
!pip install PublicDataReader --upgrade # 한번만 실행하고 주석처리 import pandas as pd pd.options.display.max_rows = 30 pd.options.display.max_columns = 100 import warnings, time warnings.filterwarnings(action='ignore') # warning을 무시하는 코드 import PublicDataReader as pdr code_df = pdr.code_bdong() code_df # 법정동 코드를 불러오는 방법입니다. # 서버에서 데이터를 불러왔다고 이해해주시면 됩니다. [29] API키로 부동산 실거래가 DataFrame으로 다운로드받기
# !pip install PublicDataReader --upgrade # 한번만 실행하고 주석처리 import pandas as pd pd.options.display.max_rows = 30 pd.options.display.max_columns = 100 import warnings, time warnings.filterwarnings(action='ignore') # warning을 무시하는 코드 from PublicDataReader import TransactionPrice api = TransactionPrice("API_KEY") # API Key를 TransactionPrice에 넣어주고 api로 만들어줍니다. api_df = api.get_data( property_type="아파트", # 아파트, 오피스텔, 단독다가구, 연립다세대, 토지, 분양입주권, 공장창고등 trade_type="매매", # 매매, 전월세 sigungu_code=11200, # 시군구의 5자리 지역코드 year_month=202304, # 조회 년월 (ex. 2023년 1월 -> 202301) ) # 위에 값들을 넣어서 불러온 것을 api_df로 할당해줍니다 api_df.head() # 할당한 api_df를 실행시켜봅니다. [30] fstring 실습
idx = 131 print(f"최근 {api_df2.loc[idx,'월']}월 {api_df2.loc[idx,'법정동']}에 한 아파트가 {api_df2.loc[idx,'거래금액']/10000}억원에 거래되었습니다.") print(f"여기는 서울특별시 {api_df2.loc[idx,'법정동']}에 있는 {api_df2.loc[idx,'아파트']} 아파트 입니다") print(f"해당 아파트는 {data1['건설사'].split('(')[0]}에서 지었으며, 총 {data1['총세대수']} 세대이며, 용적률은 {data1['용적율']}% 입니다") print(f"이번에 거래된 매물은 전용면적 {api_df2.loc[idx,'전용면적']}제곱미터의 {api_df2.loc[idx,'층']}층 입니다") [31] iframe으로 되어있는 경우 해결방법 (네이버 사내 시스템 등 selenium이 안될때)
✅ 자동화 강의 “(4) (iFrame) 인터파크 로그인 (XPATH가 안먹힐때!! 네이버 블로그/카페 등)” 수강하고 활용하세요
iframe = driver.find_element("xpath", 'FULL_XPATH') driver.switch_to.frame(iframe) # (iframe)으로 들어갈때 입력 driver.switch_to.default_content() # (iframe)에서 나오는 코드 [33] 가끔 selenium에서 텍스트 입력이 안되는 경우(ex. 네이버 스마트스토어 SmartEditorOne 등) ActionChain 방식으로 해야함
(1) 입력할 부분을 클릭하는 모듈 –> (2) ActionChain으로 입력
elem = driver.find_element("xpath", "/html/body/ui-view[1]/ncp-editor-launcher/div[2]/div/div[1]/div/div[1]/div[2]/section/article/div/div/div/div/div/p") elem.click() time.sleep(3) # smarteditorone 본문 클릭 from selenium.webdriver.common.action_chains import ActionChains action = ActionChains(driver) action.send_keys("test test").perform() # 클릭한 부분에 actionchains로 test test 입력 [34] 특정 폴더 하위에 모든 경로를 노출하는 코드
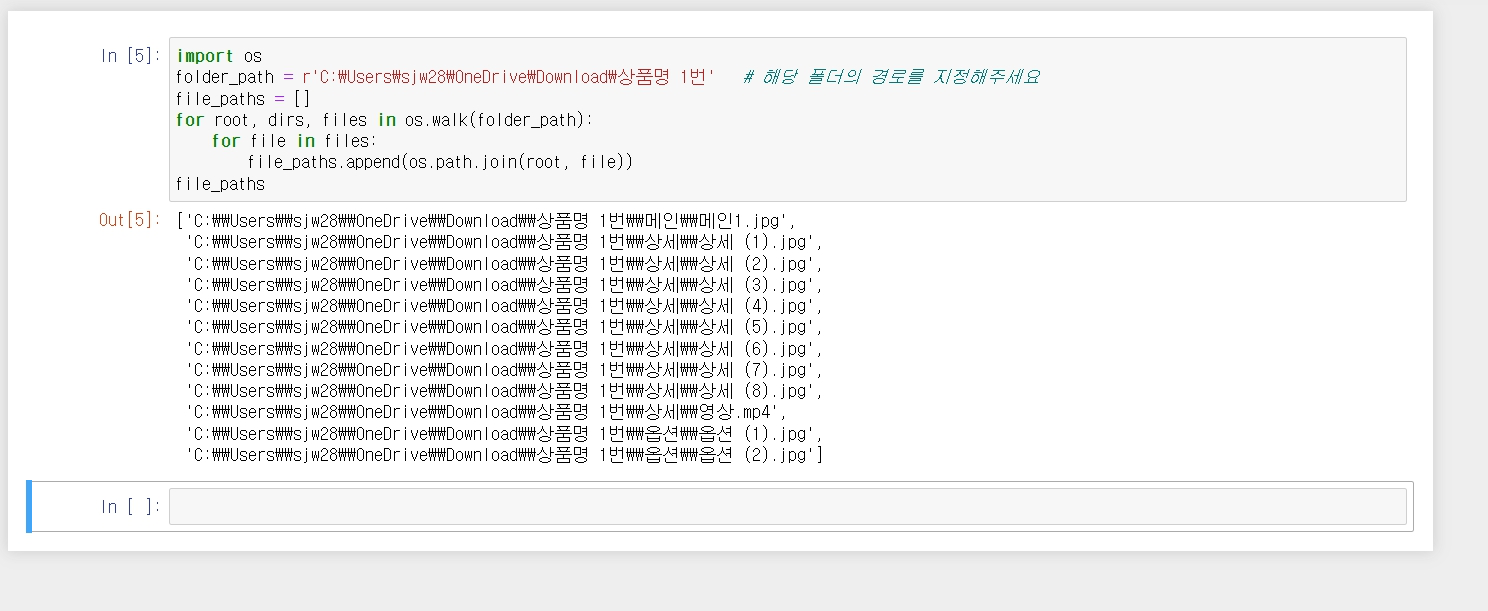
(특정 폴더의 경로를 확인하는 방법 -> https://mainia.tistory.com/m/5112)
!https://blog.kakaocdn.net/dn/cFCZIv/btszKyu6NVh/RYmjKD0A5yKJ8SePki78Wk/img.png
import os folder_path = r'여기에_폴더_경로를_넣어주세요' file_paths = [] for root, dirs, files in os.walk(folder_path): for file in files: file_paths.append(os.path.join(root, file)) file_paths [35] 드랍박스 클릭이 안될때
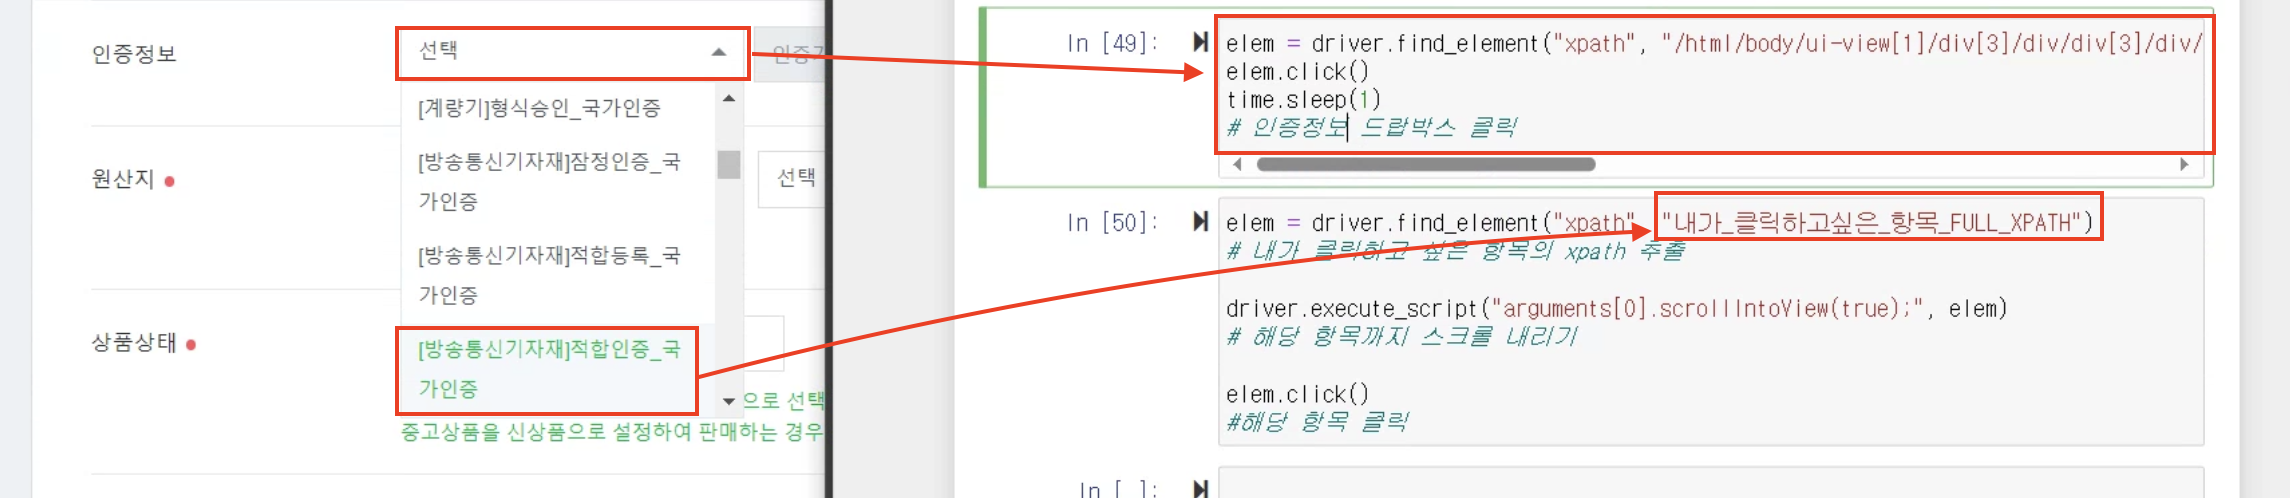
→ 드랍박스 클릭 → 해당 항목까지 스크롤을 내리는 코드 → 클릭
!https://blog.kakaocdn.net/dn/zshLg/btszKfoRL5w/9AkmwYZnMKCXfzWErpMYP0/img.png
elem = driver.find_element("xpath", "내가_클릭하고싶은_항목_FULL_XPATH") # 내가 클릭하고 싶은 항목의 xpath 추출 driver.execute_script("arguments[0].scrollIntoView(true);", elem) # 해당 항목까지 스크롤 내리기 elem.click() #해당 항목 클릭 [36] 크롬 창 사이즈 조정
driver.set_window_size(1920, 1080) # 가로x세로 사이즈를 설정 [37] 챗GPT chatgpt API 적용
#--- 챗GPT ---# KEYWORD = "Picasso masterpiece depicting" # 키워드 news_text = ''' Israel-Hamas WarExclusive Photos In GazaPaul Pelosi Attack TrialJAY-Z SpecialCBS News LiveManaging Your MoneyNewslettersNEWSSHOWSLIVELOCALWatch CBS NewsU.S.Picasso's "Femme à la montre" sells for more than $139 million at auction, making it his second most expensive pieceBY CAITLIN O'KANENOVEMBER 9, 2023 / 12:29 PM EST / CBS NEWSA Picasso painting sold at auction for more than $139 million on Wednesday – the second-highest price for a Picasso work. "Femme à la montre," a 1932 oil painting by the famed Spanish artist, was estimated to sell for $120 million but exceeded that price when this and other works from the art collection of Emily Fisher Landau went up for auction at Sotheby's in New York. In 2015, version O of Picasso's "Les femmes d'Alger" – which he painted 15 versions of – sold at a Christie's auction for more than $179 million."Femme à la montre" was the star of Fisher Landau's collection. The painting depicts Marie-Thérèse Walter, who was known as Picasso's "golden muse." Walter and Picasso had a secret relationship – because they met when she was 17 and he was married to Olga Khokhlova at the time. Sotheby's art handlers adjust Pablo Picasso's "Femme à la montre" from the Emily Fisher Landau Collection during an unveiling at the Breuer Building in New York City on Sept. 11, 2023 in New York City. ALEXI J. ROSENFELD/GETTY IMAGES FOR SOTHEBY'SWalter appeared in several of his works but this was his first public display of his love for her. Walter is depicted wearing Picasso's watch in this painting, seen as an honor, since his watches were beloved and he only painted them in three of his major works, according to Sotheb ''' # 글 내용 입력 content = f''' 아래 텍스트을 {KEYWORD} 주제에 맞게 요약해줘 in Korean. 텍스트 : "{news_text}" ''' # 프롬프트안에 키워드와 글 내용을 넣는다 print(content) messages = [{"role":"user", "content":content}] # 챗GPT가 읽을 수 있게 messages로 만들어준다 completion = openai.ChatCompletion.create( model="gpt-3.5-turbo", messages=messages) gpt_answer = completion.choices[0].message.content # 챗GPT에게 넣어서 답변을 받아냄 print(gpt_answer) [38] 하나씩 하면 잘 되는데 전체 실행하면 에러가 나는 경우 → 대부분이 이전 코드가 완료되기 전에 코드가 실행이 되서 에러가 발생합니다. 아래와 같이 조치를 해보세요
- [38-1] 에러가 나는 부분 앞에 time.sleep(10) 과 같이 충분히 넣어준다.
- [38-2] 위에 방법이 안되면, 아래와 같이 코드를 짜본다. 만약 실행이 정상적으로 되면 break하고 실행이 안되면 retry and sleep하도록 한다.
for idx in range(10): try: "에러가 자주나는 코드" # 코드 입력 break #성공하면 break except: print("# 에러발생") time.sleep(10) [39] 엑셀파일 xls로 저장하는 방법
temp_df.to_excel('doption.xls', index=False, engine='openpyxl') [40] 복사 버튼을 눌러서 클립보드로만 출력이 되는 경우(왼쪽 글씨는 크롤링이 안됨)
!https://blog.kakaocdn.net/dn/drI0GR/btsBjCbjPdn/bgN9SkhGDb7OTvWnRPOTg1/img.png
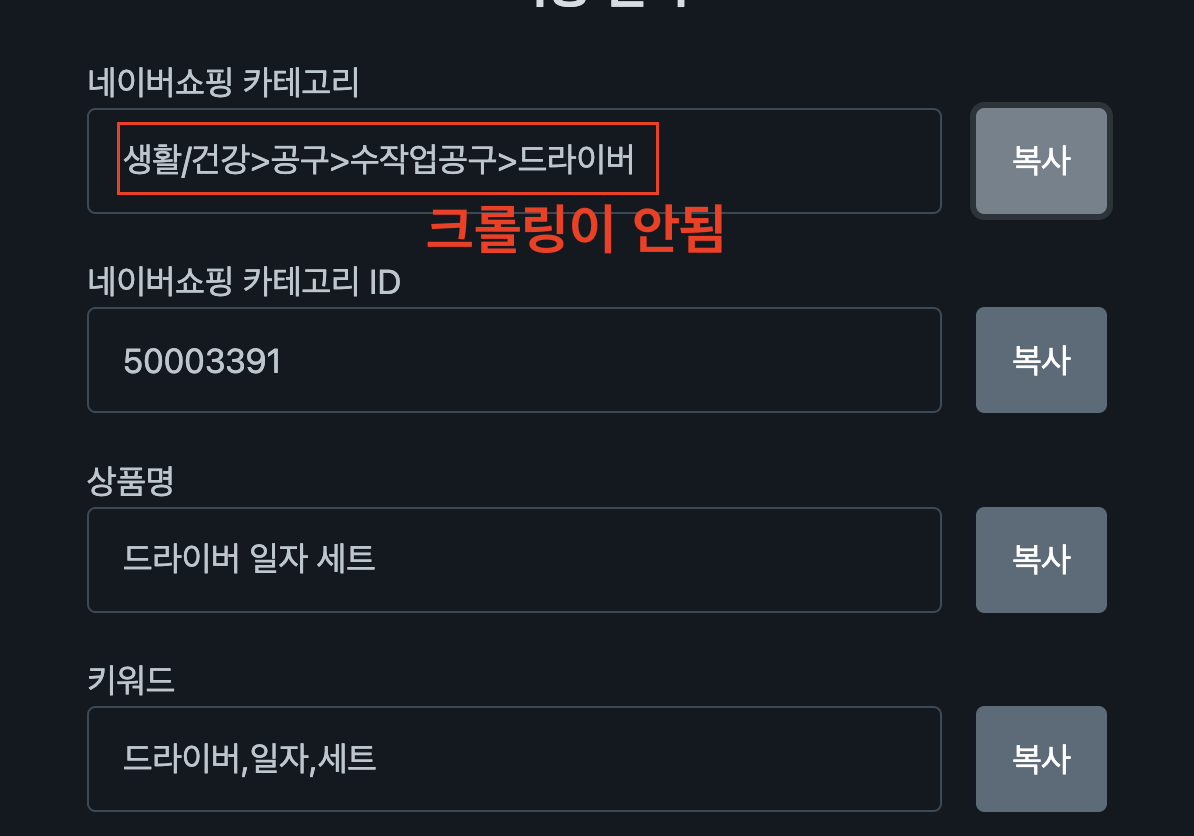
elem = driver.find_element("xpath", "/html/body/div/main/div/div/label[1]/div/button") elem.click() # 복사 버튼 클릭 import pyperclip TEXT = pyperclip.paste() print(TEXT) # 클립보드에 있는 값을 출력 [41] 반응형 웹으로 되어있어서, 창이 작아질때 모바일로 변하는 경우
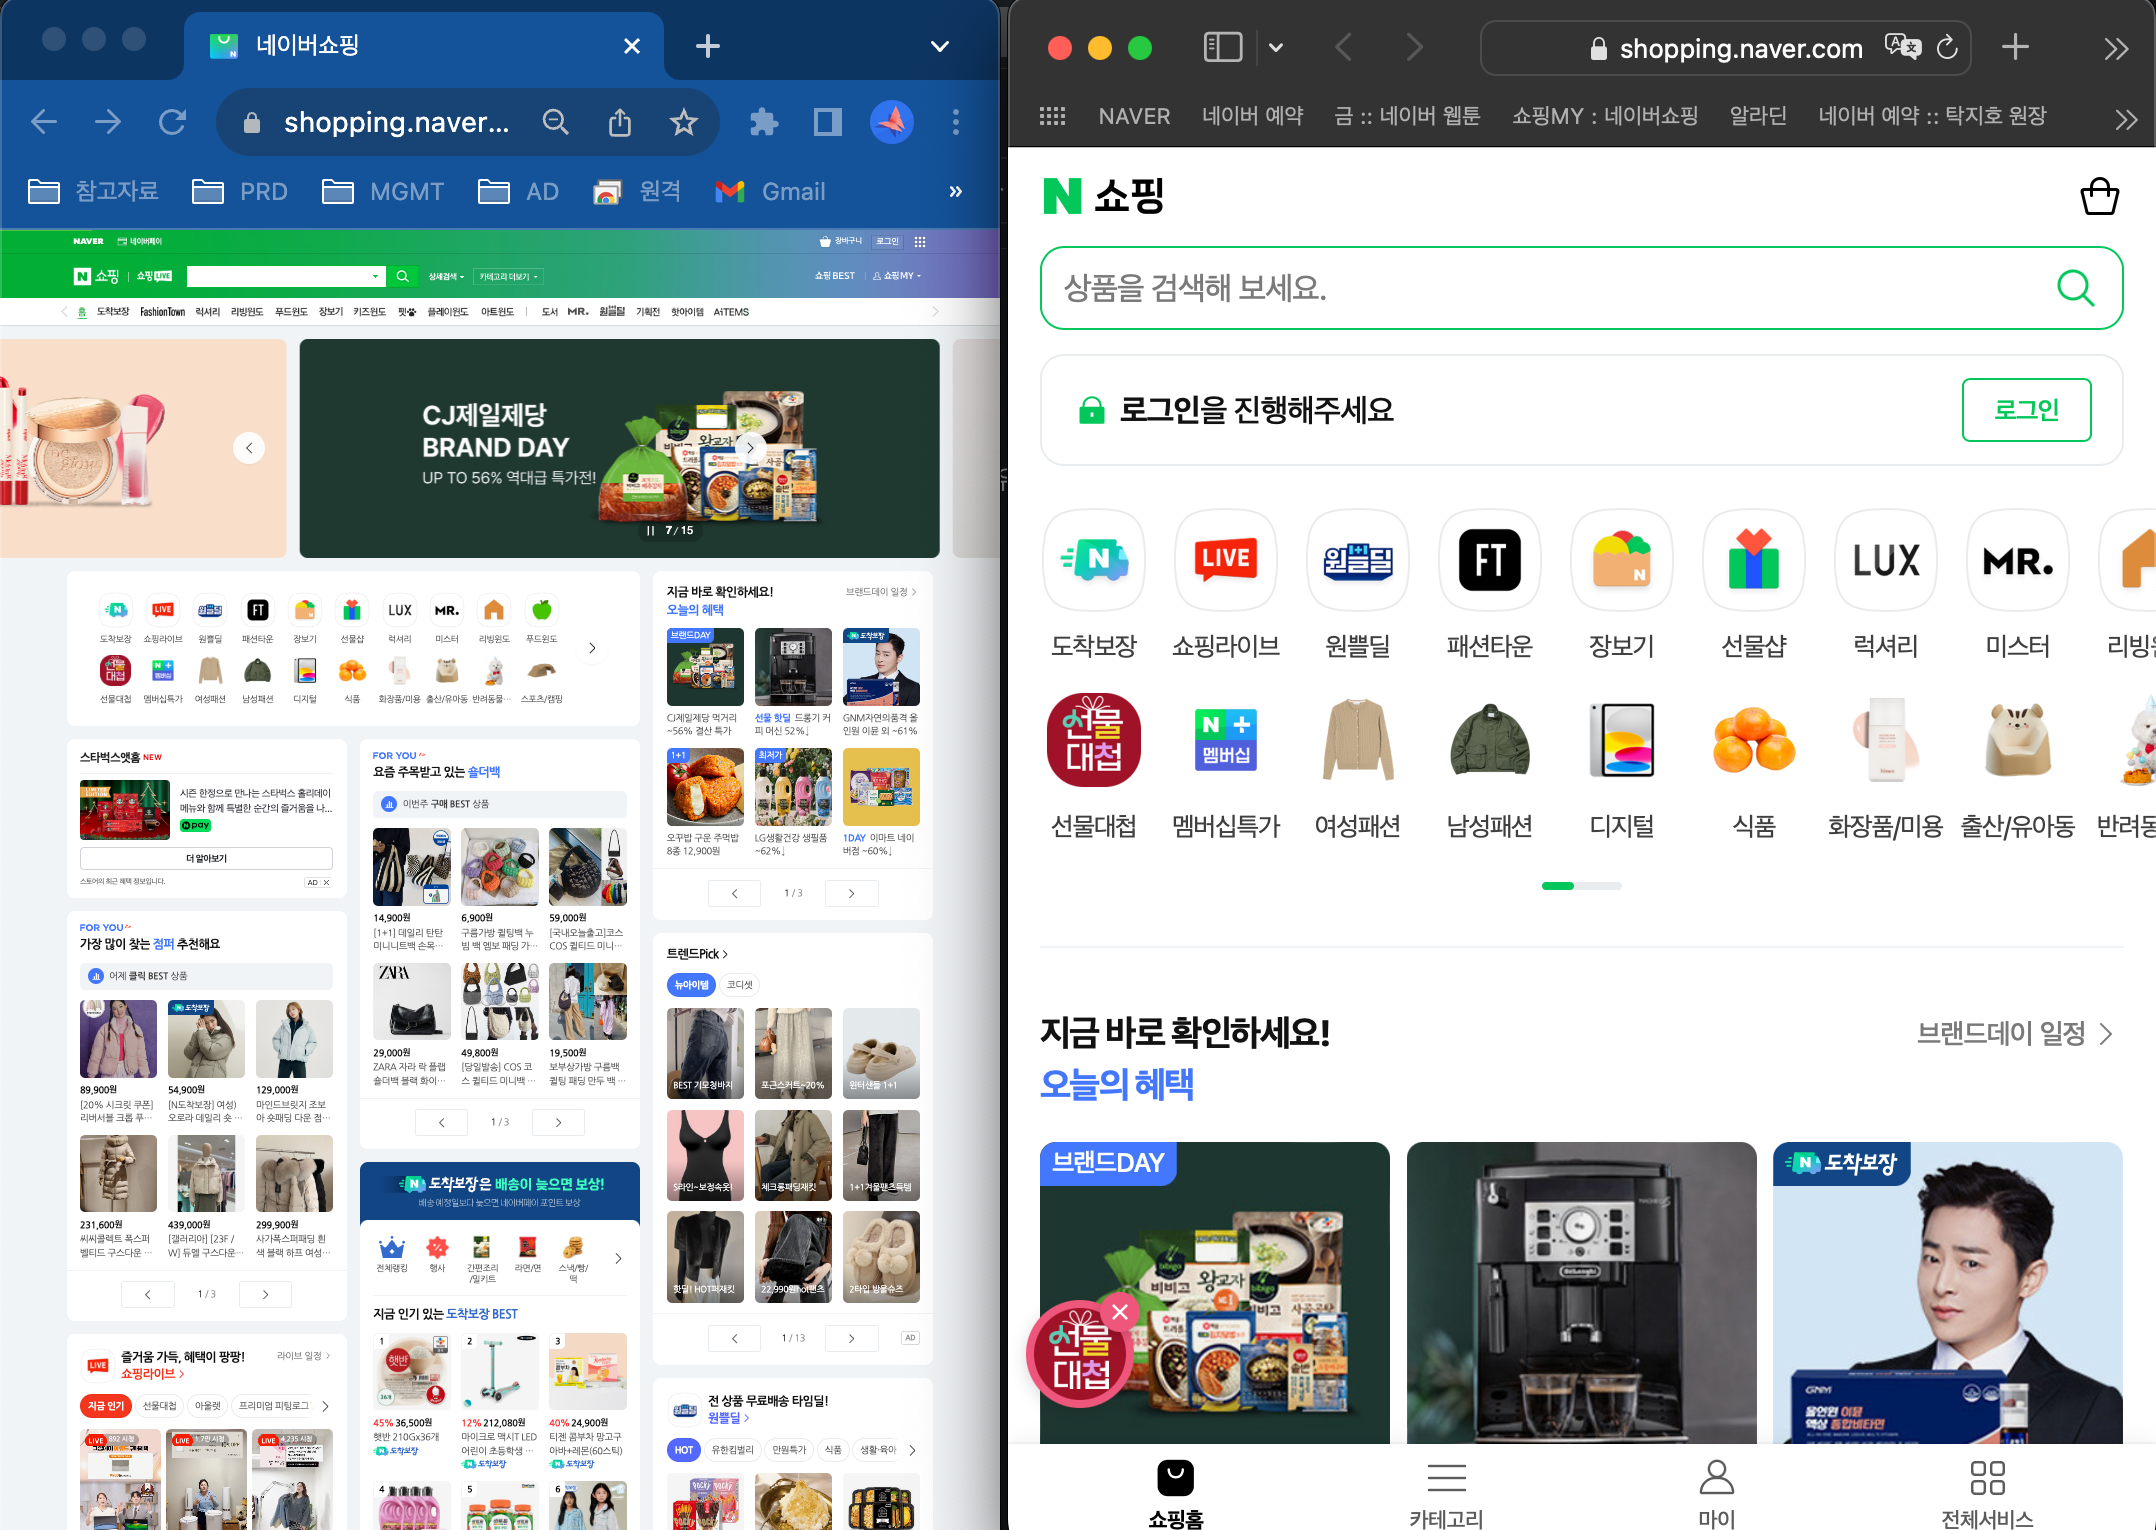
- 아래 코드를 사용하면, 화면 배율을 특정 비율로(여기서는 50%) 만들어서 모바일 버젼으로 화면이 뜨지 않습니다.
- 좌/우가 같은 사이트인데, 좌측의 경우 화면 배율이 낮아 PC버젼으로 뜨며, 우측은 화면배율이 높아 모바일버젼으로 뜹니다.
!https://blog.kakaocdn.net/dn/dCtC5D/btsBFMluL8V/yRuKu2vBK1Rl5YbWBboQ11/img.png
driver.execute_script("document.body.style.zoom='50%'") [42] (꼼수..?) 잦은 xpath 변경시 쉽게 대처할 수 있는 방법
for FULL_XPATH in [ f"", f"", f"ERROR", ]: try: elem = driver.find_element("xpath", FULL_XPATH) # 날짜 date = elem.text break except: if FULL_XPATH == 'ERROR': raise RuntimeError [43] 특정 글자가 들어간 버튼 클릭
target_text = '클릭_텍스트' # 텍스트가 포함된 버튼을 찾기 elem = driver.find_element("xpath", f"//*[contains(text(), '{target_text}')]") [44] xpath말고 class로 elem을 설정하는 방법
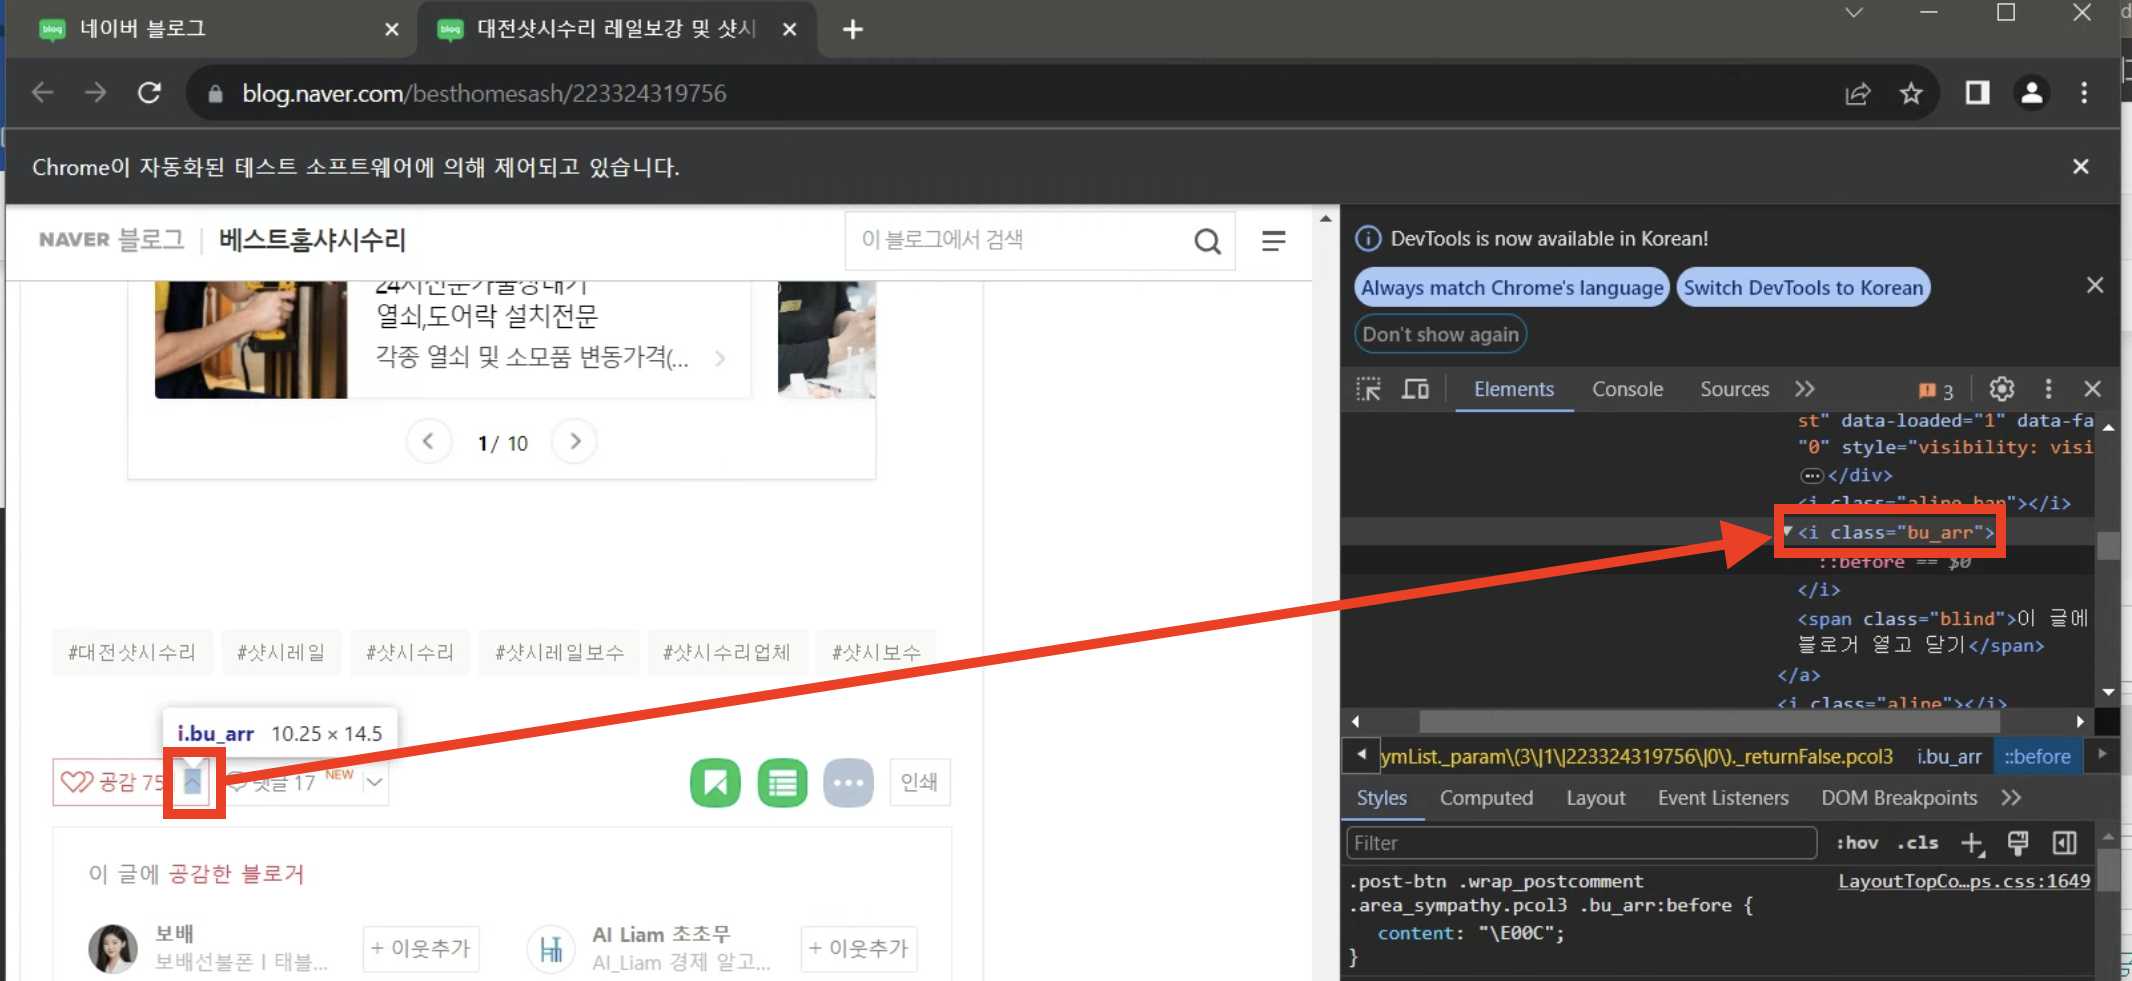
- 가끔 xpath로는 절대로 안되는 사이트도 있습니다. 그럴때 class를 쓰면 잘될때도 있습니다.
(그런데 여태까지하면서 네이버 블로그만 그랬습니다…?)
!https://blog.kakaocdn.net/dn/4hon9/btsDwEZ7gOz/PHpcYbcpgcoGaQzhxMEsEK/img.png
from selenium.webdriver.common.by import By elem = driver.find_element(By.CLASS_NAME, "bu_arr") [45] 구글 스프레드 시트 Python 연동
- **구글 클라우드 서비스 : https://console.cloud.google.com/apis/dashboard**
import gspread google_json_key = "다운받은_json_파일경로" spreadsheet_url = "구글_스프레드_시트_주소" gc = gspread.service_account(google_json_key) doc = gc.open_by_url(spreadsheet_url) sheet = doc.worksheet("시트1") google_df = pd.DataFrame(sheet.get_all_values())